How to Draw Floor Plan in Autocad 2015
How to Draw a Flooring Plan with SmartDraw
This is a simple step-by-step guideline to help you lot describe a bones flooring plan using SmartDraw.
- Cull an area or building to design or document.
- Take measurements.
- Start with a bones floor plan template.
- Input your dimensions to calibration your walls (meters or anxiety).
- Easily add new walls, doors and windows.
- Drag and drib ready-fabricated symbols to customize your space: furniture, kitchen, bathroom and lighting fixtures, cabinets, wiring, and more.
Watch the video and read beneath for more.
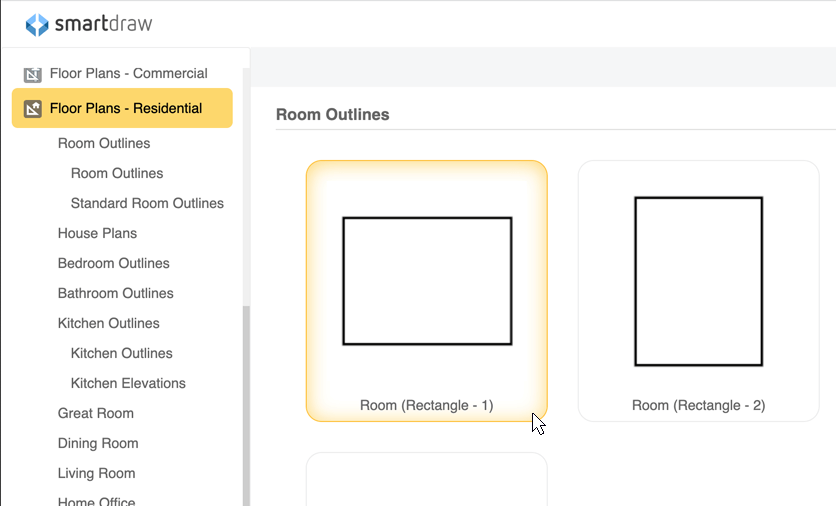
Pace 1. Select a Room Outline
Open Floor Plans - Residential from the diagrams list along the left-hand side of the screen. Yous'll see a number of subcategories listed. Rather than choosing a kitchen template, we'll start with a basic room shape. Information technology's highlighted every bit shown here: Room (Rectangle - 1).
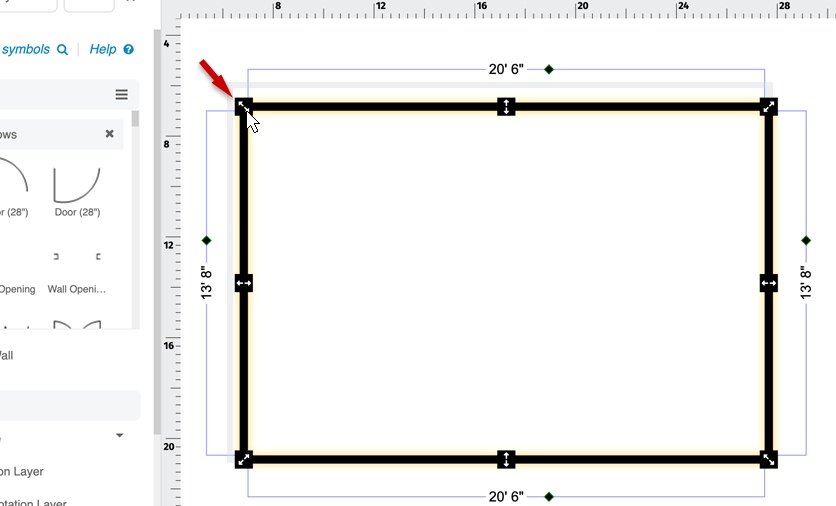
Step ii. Input Room Dimensions
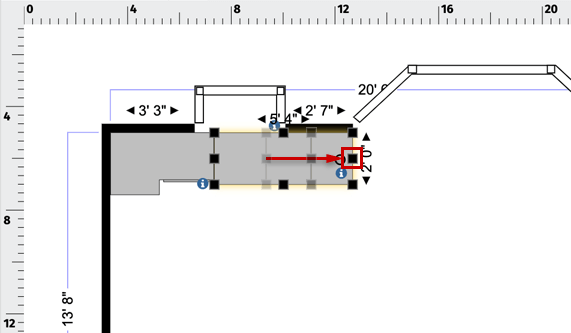
SmartDraw will open a work surface area for you lot with a rectangular room having default dimensions of xv'0" by 20'0". You can change these dimensions in i of ii means. Either click on a wall and slide it to its desired length, or click on the dimension and blazon in the measurement you want to employ. When y'all do this, you lot'll note that the reverse wall volition resize to the same dimension automatically.
Nosotros want to re-size this room to 13'8" by xx'vi".
To resize simply one wall, click at the corner and drag to resize the wall. Clicking in the middle of the wall will keep both opposing walls the same size.
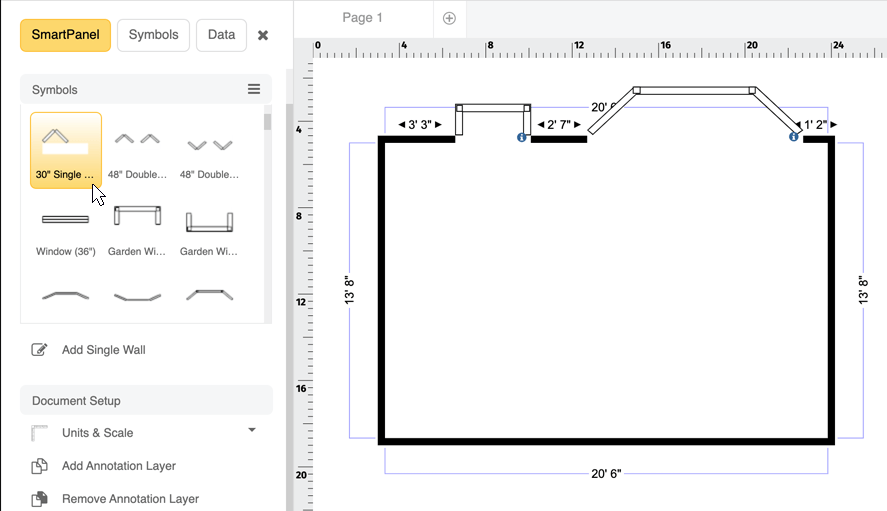
Step three. Add Doors, Windows, and Wall Openings
Yous don't need to create openings in walls for your windows and doors; SmartDraw will practise it for you automatically. Our kitchen plan has 2 wall openings into adjacent rooms, plus a garden window over the sink and a bay window viewing into the dorsum k.
Click Add Wall Opening in the SmartPanel. As you move your cursor onto the folio, yous'll see the wall opening shape. Position it anywhere on the appropriate wall and you'll come across the icon alter from a stamp to an anchor, indicating you can click to adhere it to the wall. You tin at present resize the opening and motion it around on the wall until it's positioned where you want.
Add windows in the same mode. From the SmartPanel, you'll run into a multifariousness of door and window options. Nosotros'll add a garden window and a bay window, as shown below. Considering the default size of the bay window is 12' across and ours measures only 6' we had to adjust the size past clicking on the measurement and typing in the new effigy.
Note that as you stamp elements into your work area, yous tin rotate them by clicking and holding on the rotate button and then moving your mouse around in a clockwise or counterclockwise direction. When y'all get information technology into the proper orientation, release the push button.
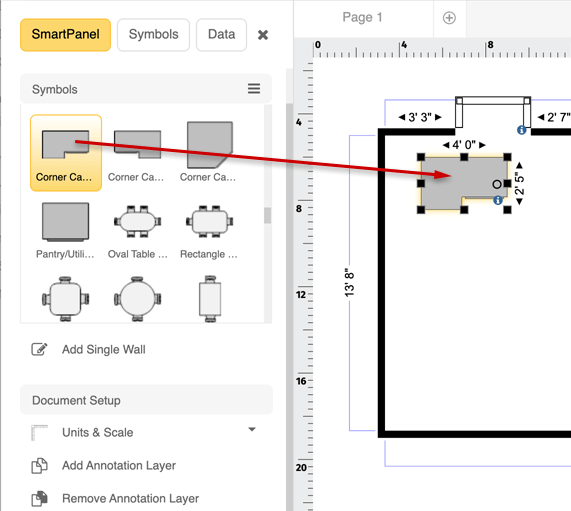
Step four. Lay Out Countertops
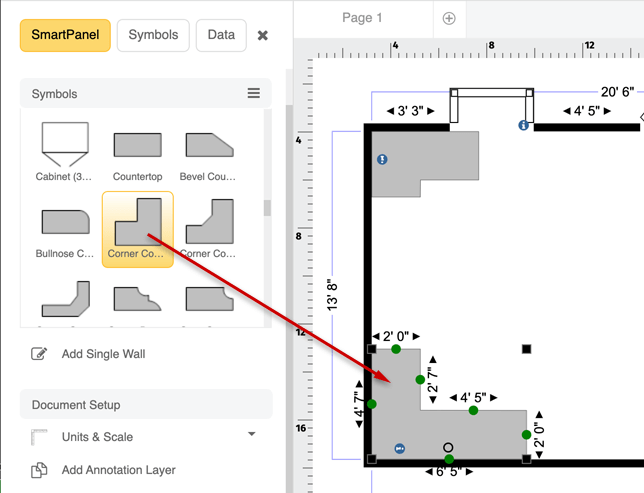
Click on the drop-down listing in the SmartPanel and then select Kitchens. You'll come across a number of appliances, cabinets and countertops. If you lot're going to use stock cabinets, and so you should use those hither instead of countertops since their sizes tin can't exist changed. Our design will use custom cabinets, so nosotros're going to lay out our countertop first.
We'll start past placing a corner counter in the upper left mitt corner of the room. Just stamp it anywhere in the room, then use the rotate push button to turn information technology 180 degrees. Now elevate it into position in the upper left-paw corner of the room, equally shown.
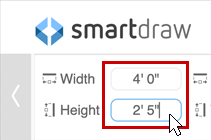
To resize the countertop, just click the edge you want to alter and drag it into position. In this case, it's the upper right edge. Nosotros want our countertop to measure 12'0" beyond the north wall and five'0" along the west wall.
This tin can also be washed in the toolbar. Click the Design tab, and so change the dimensions as shown below.
Nosotros're going to add together another countertop in the lower-left hand (southwest) corner of the kitchen. This is done the same fashion equally the previous countertop. One time you rotate the countertop into its right orientation, click the Blueprint tab. Set the width to seven'5" and the height to 5'0" and so motility information technology into position. Your flooring programme should now wait similar this:
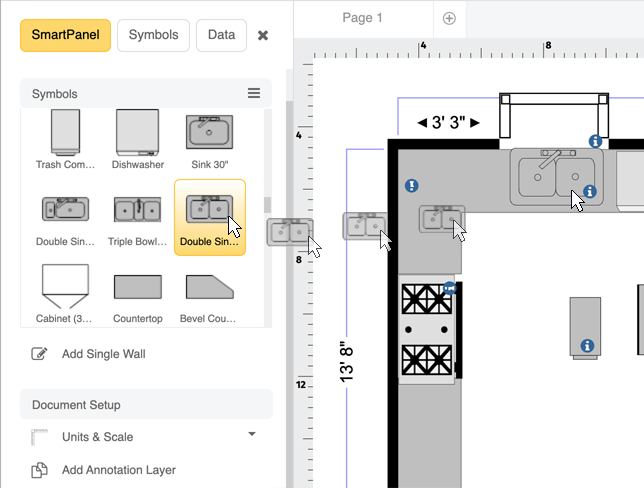
Add Sink
Now nosotros tin identify a sink in the countertop under the garden window. Select the double sink 36", click on it and stamp it into identify. Any time you need to accommodate the placement of any object in your floor programme cartoon, just click on it and motion it using your mouse or the management arrows on your keyboard. Your drawing at present looks like this:
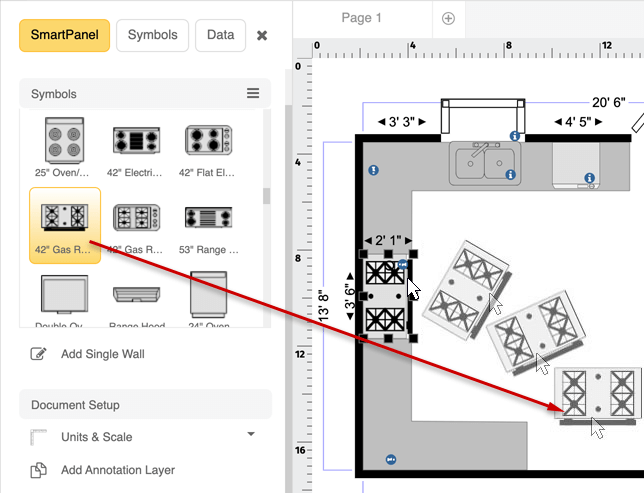
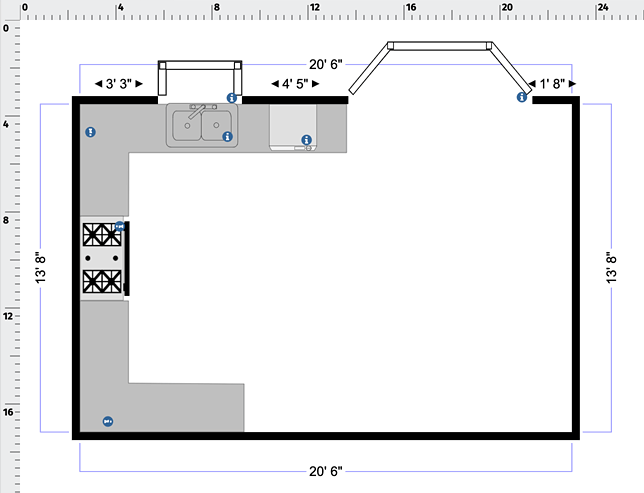
Step 6. Add together Appliances
Our kitchen will be equipped with these appliances:
- 42" gas range and oven
- Range hood
- Side-by-side counter-depth refrigerator
- Standard-sized dishwasher
Nosotros do this in much the same fashion equally we did with the other design elements. Select the item you desire, stamp it onto your work area, and and then elevate it into position. Using the pointer keys is the easiest manner to fine-tune placement of items. Nosotros'll start with the dishwasher:
At present we'll add our 42" gas range/oven. Do this the aforementioned way, by selecting the detail and stamping it on the work area. Use the rotate push button to orient it correctly, then drag it into position. Utilize the arrow keys, as needed, to fine melody its placement.
Now follow the verbal same steps to add a range hood and the 26 cubic-foot side-by-side refrigerator. Make certain to rotate both into proper alignment. When you cease, your kitchen floor programme drawing will expect like this:
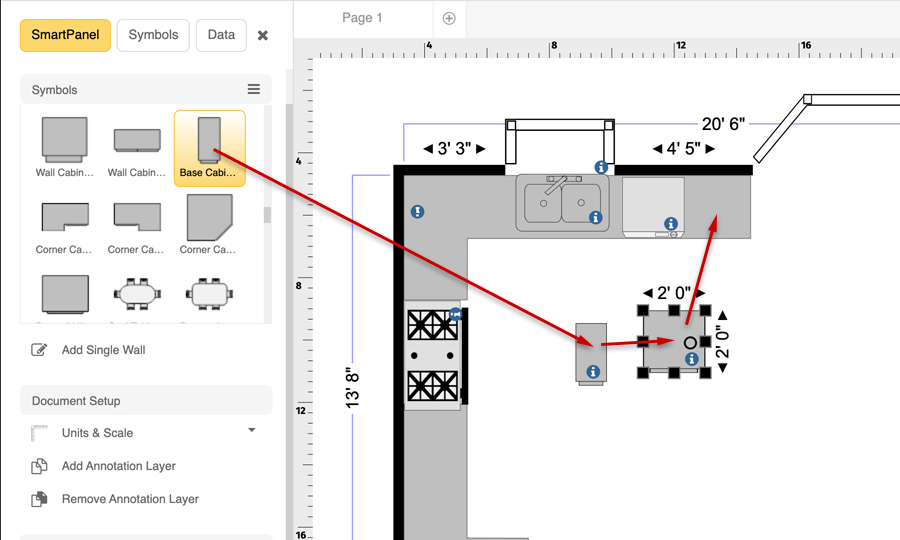
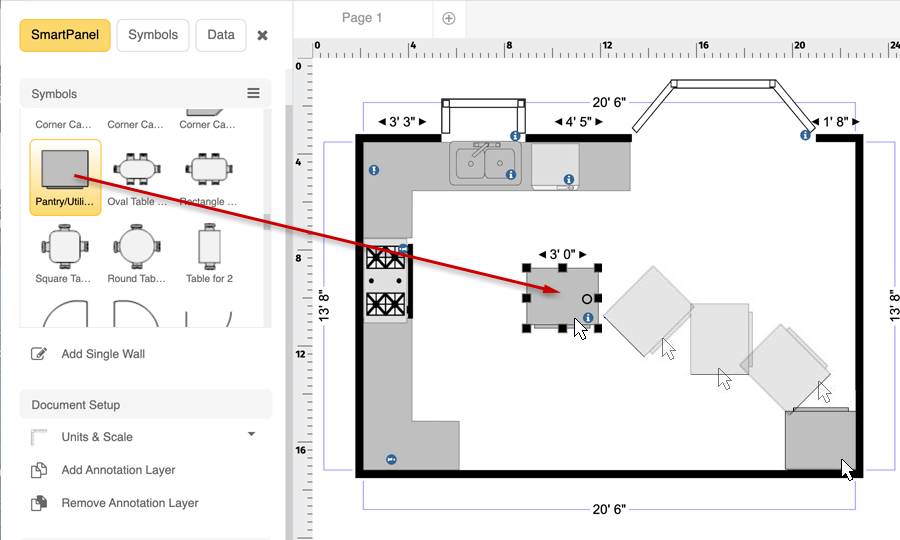
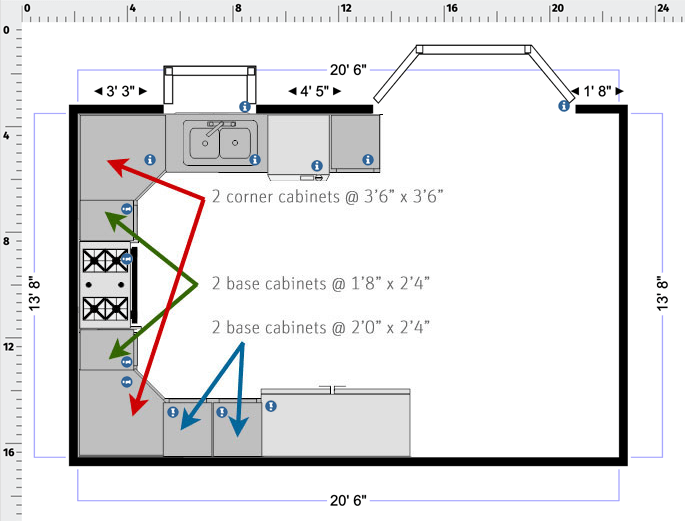
Step 7. Add Base of operations Cabinets
Next, we'll add together a pantry chiffonier in the lower right-hand (southeast) corner of the kitchen. Select the Pantry/Utility Chiffonier from the SmartPanel, rotate information technology and elevate it into position.
Next, nosotros'll add base cabinets to our plan. As mentioned previously, nosotros're designing for custom cabinets, so we're non limited to standard sizes. The default base cabinet is 12" wide past 24" deep. By sliding our dishwasher left a few inches, we can fit a 24" base cabinet to the right. We can resize this cabinet to be 2'0" in width and 2'iv" in acme (depth), then slide it into position.
At present we'll add together a pair of corner cabinets and more base of operations cabinets. Again, resize and rotate them into position as yous've done with the other items. Our kitchen floor plan now looks similar this:
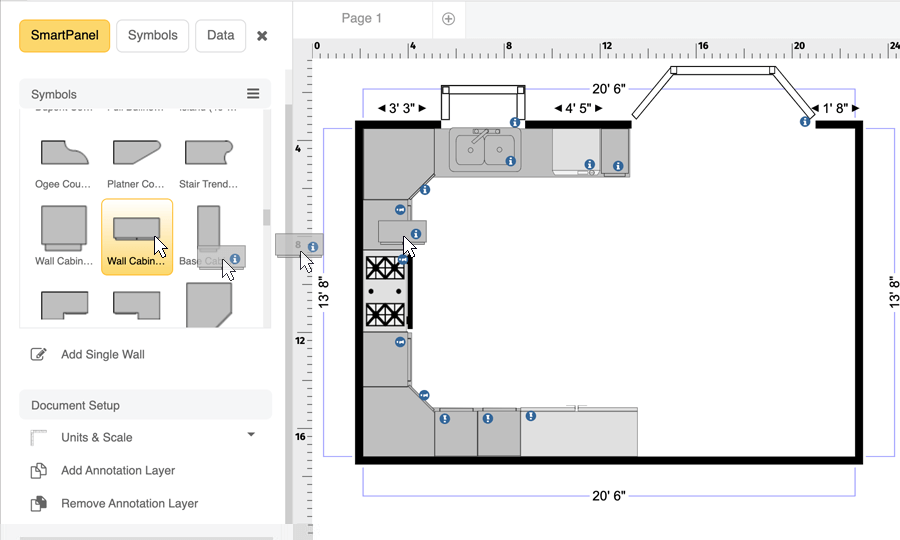
Step 8. Add together Upper Cabinets
We'll add together upper cabinets in a like manner. Select Wall Cabinet from the SmartPanel. The default size is 1'0" by 2'0", which nosotros want to alter to i'four" by ane'8". Afterwards rotating it 90 degrees and dragging it into position, we'll want to make three more exactly similar it. To practice this, right click on the item, select Copy and and then Paste. Each time y'all do this, drag the newly created upper cabinet into position, as shown beneath.
At this bespeak, y'all're ready to consummate the upper cabinets. Feel gratis to experiment with what you've learned and then far. Try adding a smaller corner cabinet in the lower-left corner and open shelves betwixt information technology and the fridge. And then add together upper cabinets higher up the refrigerator. The final blueprint should expect something like this:
freudenburgcomead98.blogspot.com
Source: https://www.smartdraw.com/floor-plan/how-to-draw-a-floor-plan.htm
0 Response to "How to Draw Floor Plan in Autocad 2015"
Post a Comment